How to create a self-signed SSL certificate for Exchange Server 2003/2007/2010
Steps to create self signed
Step – 1
Open an Exchange Management Shell go to the Start Menu -> Microsoft Exchange You can also start a standard Powershell 2.0 Console and load the Exchange
[PS] C:\>add-PSSnapin *exchange*
[PS] C:\> Get-PsSnapIn -Registered
Step – 2
Within the Exchange Management Shell (EMS), List the existing certificates and the services they are enabled for using:
[PS] C:\>Get-ExchangeCertificate
Thumbprint Services Subject
————— ———— ———-
27A2E4F546791A7D079E24FAD2EC4599B8D95152 IP.WS CN=xyzcomanyname
Step – 3
In EMS, create a new Certificate Request with Alternate Domain Names (for your internal and external hostnames)
[PS] C:\> New-ExchangeCertificate –
Company Inc,cn=webmail.mycompany.com”-
webmail.mycompany.com
PrivateKeyExportable $true -path certrequest_xyzcomanyname.csr
Thus, you will get a new Certificate Request that has been saved in the CSR file “C:\certrequest_xyzcomanyname.csr”. A new Get-ExchangeCertificate cmdlet command will show the new list of certificates, which includes the new certificate request. At this point, the CSR has not been certified, so it can be used.
Note: You can also have some alternative ways to create a Certificate Request on Windows and IIS but this method is best among all that lets you specify a list of alternate domain names. (Which is a requirement for multiple organizations running internal/private and external/public networks in parallel).
Step – 4
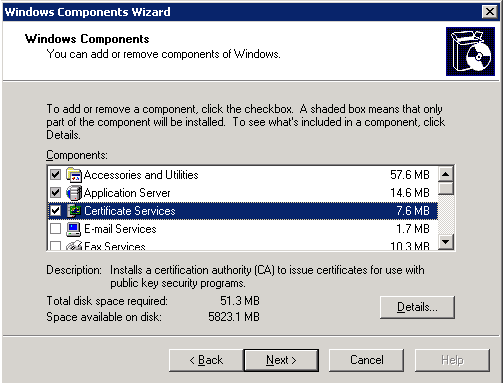
Before performing the signing of the CSR, make sure that Microsoft’s Certificate Services is installed on your machine. If you have installed this, open the Control Panel, click on Add/Remove Windows Components and check that “Certificate Services” is checked.
You will be asked to enter information about the certificate authority (CA)
Common name for this CA:xyzcomanyname .mynetwork.local- Distinguished name suffix: DC=mynetwork
,DC=local - Validity period: 5 years
Click “Next”. The following screens
Step – 5
In the next step, we’ll
“http://xyzcomanyname.mynetwork.local/certsrv”
If your server is only configured to support SSL as a default for a dedicated Exchange machine, “https://xyzcomanyname.mynetwork.local/certsrv”. You will be asked for your Domain credentials, enter them.
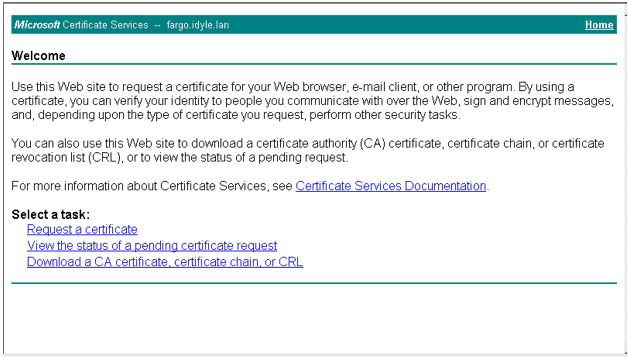
Click on the ‘Request a Certificate’ link and then click on “advanced certificate request”. In the Advanced Certificate Request page, click the “Submit a certificate request by using a base-64-encoded CMC or PKCS #10 file, or submit a renewal request by using a base-64-encoded PKCS #7 file.” option (to renew the certificate).
Step – 7
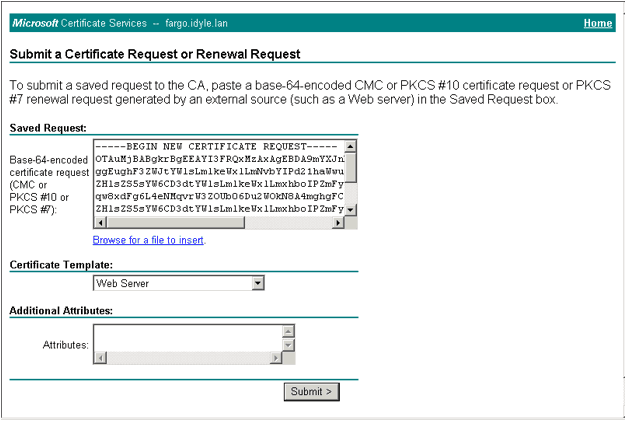
Open the certificate request (CSR) file you created in Step 2 with notepad or any other text editor. It will look like this
——-BEGIN NEW CERTIFICATE REQUEST——-
OTAuMjBABgkrBgEEAYI3FRQxMzAxAgEBDA9mYXJnby5pZHlsZS5sYW4MC0lEWUxF
ggEughF3ZWJtYWlsLmlkeWxlLmNvbYIPd21haWwuaWR5bGUuY29tgg9mYXJnby5p
ZHlsZS5sYW6CD3dtYWlsLmlkeWxlLmxhboIPZmFyZ28uaWR5bGUubGFugg5tYWls
qw8xdFg6L4eNMqvrW3ZOUb06Du2WOkN8A4mghgFCUDvBihyMVY6nczx+qvJkwPBo
[……..]
ZHlsZS5sYW6CD3dtYWlsLmlkeWxlLmxhboIPZmFyZ28uaWR5bGUubGFugg5tYWls
qw8xdFg6L4eNMqvrW3ZOUb06Du2WOkN8A4mghgFCUDvBihyMVY6nczx+qvJkwPBo
——-END NEW CERTIFICATE REQUEST——-
Step – 8
Paste the complete certificate request into the “Saved Request:” box of the Microsoft Certificate Services web page. Select “Web Server” for the “Certificate Template” and click “Submit”.
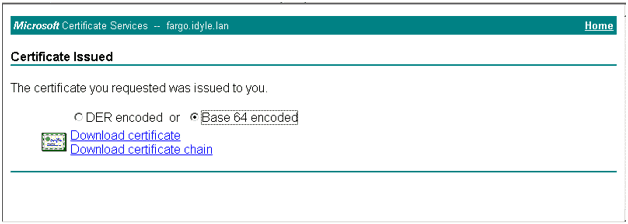
Once your certificate has successfully signed and generated, select “Base 64 encoded” option and click “Download certificate”. Save the file on your computer as “C:\certselfsign_xyzcomanyname.cer”
Go back to the Exchange Management Shell (EMS) and Import the newly self-signed certificate:
[PS] C:\> Import-ExchangeCertificate -path c:certselfsign_xyzcomanyname.cer –
Step – 11
Verify the certificate has been properly imported and retrieve its Thumbprint with:
[PS] C:\> Get-ExchangeCertificate
Thumbprint Services Subject
————— ———— ———-
9799CEEBEA4FFADE068FC73FE63EB0495DD4F8A0….. CN=webmail.mycompany.com, O=My Comapny Inc, DC=mycompany, DC=com
86214B8F1951E8B062955835D0C4C62D89E8D83F….. CN=xyzcomanyname.mynetwork.local, DC=mynetwork, DC=local
27A2E4F546791A7D079E24FAD2EC4599B8D95152 IP.WS CN=xyzcomanyname
The new certificate is the one we registered the request for using the public hostname (webmail.mycompany.com). The other new certificate is the certificate for the CA we installed through Microsoft Certificate Services.
Step – 12
In the last step, we have to enable the new certificate for all
[PS] C:> Enable-ExchangeCertificate-
thumbprint 9799CEEBEA4FFADE068FC73FE63EB0495DD4F8A0 -services “IIS,POP,IMAP,SMTP”
[PS] C:> Get-ExchangeCertificate
Thumbprint Services Subject
————— ———— ———-
9799CEEBEA4FFADE068FC73FE63EB0495DD4F8A0 IP.WS CN=webmail.mycompany.com, O=My Comapny Inc, DC=mycompany, DC=com
86214B8F1951E8B062955835D0C4C62D89E8D83F ….. CN=xyzcomanyname.mynetwork.local, DC=mynetwork, DC=local
27A2E4F546791A7D079E24FAD2EC4599B8D95152 ….S CN=xyzcomanyname
You’re now all done. Your internal “https://xyzcomanyname.mynetwork.local” and your external “https://webmail.mycompany.com” will both be valid certificates which will let your clients connect through Outlook, through Outlook Web Access (OWA) and through Outlook Anywhere (RPC over HTTPS) for mobile devices.
95%OFF
Comodo Positive SSL
78%OFF
RapidSSL Certificate
95%OFF